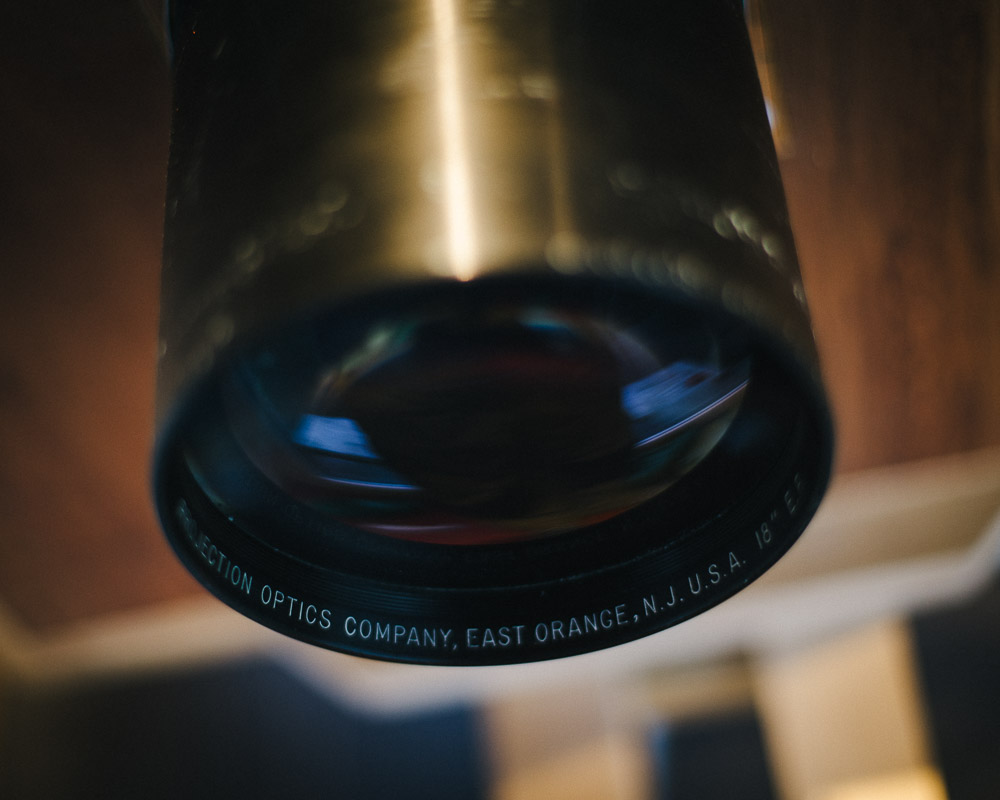
Projection Optics Company 18″ E.F. – “Lens Review”
I saw lenses similar to this pop up a few times on wet plate sites and groups, usually surrounded by little concrete evidence on the usability for wet plate, sharpness, coverage, … so this “Review” hopefully helps some people who are considering getting one themselves or wondering what they just bought. Note that there exists an similar (I suspect it’s rebranded ) lens under the name ” Charles Beseler 18″ E.F.” I’ve also seen other focal lengths of similar lenses (12″ and 20″).
I got this lens quite cheap (30 Euros including shipping) and it still came with bits of the original device attached to it. I got it with little expectations, hoping it would maybe cover 8″x 10″ and be good (and fast enough) for portrait use. These lenses usually go in episcopes if you want some keyword to search for. However, my device seemed more like a traditional projector. The dude selling it was suggesting to use it as retro-industrial lamp or decorative piece. Well I’ll still make a lamp out of it but just without the lens installed 🙂 so either the retro industrial lamp or the lens came free you decide… Similar lenses minus device seem to be on offer regularly in the 60-250 dollar range (with one outlier claiming 700 dollars).
Tech Specs
This lens is an 18″ (457 mm lens). The aperture is not mentioned but after measuring the entrance pupil the math works out to f/3.6. The aperture is fixed at f/3.6 there is no diaphragm or slot for Waterhouse stops. I did some preliminary tests and it seems an cardboard aperture is effective at stopping the lens down (see below). It’s quite big and heavy ~2.5 kg so take this into account for any camera you are trying to mount it on.
Optics
These projection lenses are often Cooke triplets. This is a more recent (as recent as 1893) three element design than the Petzval lens (est. 1840) loved by collodionists. It is so “advanced” it corrects the swirly bokeh “artifact” of Petzvals. But bokeh lovers don’t despair, a 457mm f/3.6 lens is still a bokeh fest. Depth of field is usually millimeters. And even at focus distances of 10 ~ 15 m it’s still more than isolates anything you focus it on.
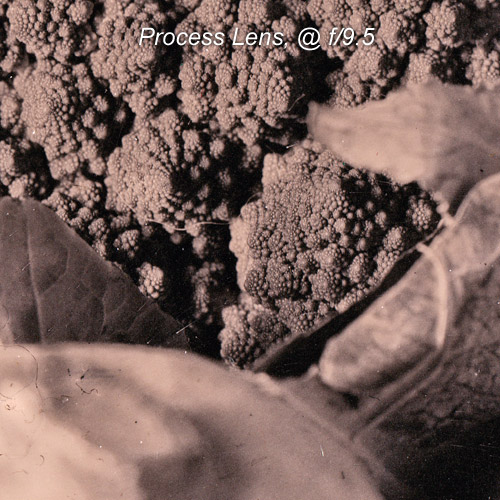
Sharpness & Contrast
One of the biggest worries people have when using projection lenses is low sharpness and this lens is certainly not outstanding in this respect. However, it is quite a bit better than I expected. It certainly has the resolving power for ambrotypes and contact prints (and probably more than enough for alternative processes on rough paper). I wouldn’t use it in an enlarger though. I think the bad reputation of projector lens sharpness when used as taking lenses mainly comes from people mounting them on dslr or 4″x5″ cameras and then trying to do enlargements from it. In my opinion it is certainly not recommended for that unless you generally don’t care about sharpness for your style of photography.
Contrast (a.k.a. micro contrast) of this lens is quite low. I find this lens has a certain soft-focus (i.e. low micro contrast) feel to it. I wouldn’t call it bad for subjects such as portraits but if you want very crispy details (rocks, tree barks, …) I think you wouldn’t be happy with it.
To get an feel of the sharpness and contrast I would compare it to the nifty fifty ( Canon 50mm f/1.8 lens) wide open. Some people will diss it but many people start out with as their first prime lens and get quite nice images out of it. It also has some noticeable softness like the fifty… (obviously this is not like a scientific comparison)
Also note that f/3.6 gives really narrow dof, it’s almost too wide. At shoulder portrait ranges for 18cm x 13cm plates f/3.6 still barely keeps the eyes in focus. Nose and forehead will already be out of focus. So while the in-focus bits are sharp only a very small portion of the photo will actually be in focus (obviously this is common to all f/3.6 lenses).
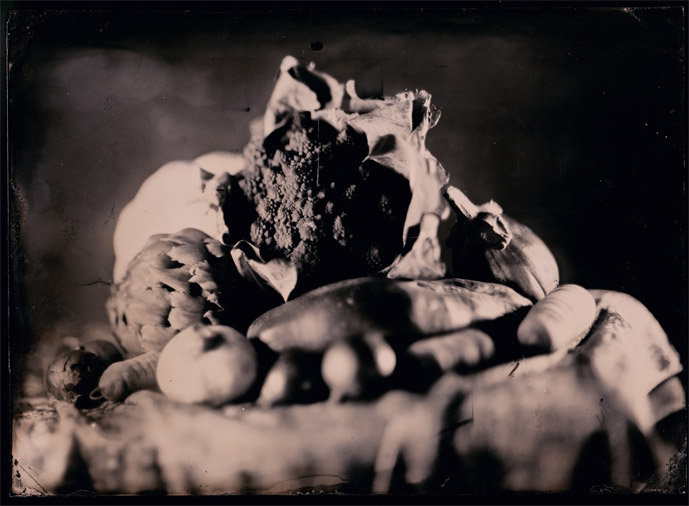
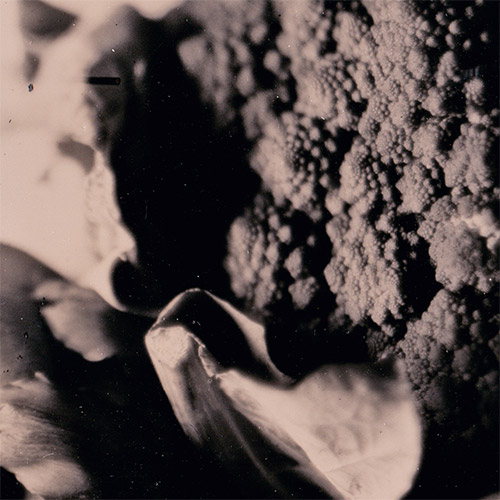
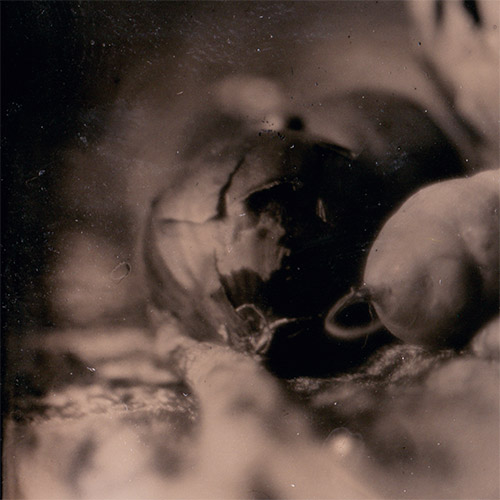
The pictures below should give you an idea of the quality at f/3.6. It’s obviously difficult to show on a monitor. I resized the main image so it displays around original size on a 96 dpi monitor. Note that the crops are displayed about 4x larger than reality on 96 dpi desktop monitors (they are 3×3 cm). The scans seem pretty accurate not less sharp/sharper than the original. I disabled any driver “optimizations” to avoid it trying to sharpen the image. The image was resized with plain “bicubic” in photoshop so it shouln’t add much sharpening either. No denoising or dust filters either. Also note that the lens was horizontally tilted to shift the focus plane. This “hides” the shallow dof a bit.
Coverage
From the device it was attached to I figured out it should at least cover something like 20 cm x 20 cm but in fact it covers a lot more. Focused at infinity it falls just short of covering 35 cm x 42 cm which is the largest my camera currently handles. The image circle seems about 50 cm at infinity. At a portrait focus distance of about one meter it covers the full 35 cm x 42 cm area I can measure.
However, there is a caveat besides coverage for ultra-format use: while good in the center the sharpness falls off towards the edges (I think it barely starts to be noticeable in the edge pics above but that’s just a 18 cm x 13 cm plate). This is to be expected and I would again compare it to the nifty fifty wide open; don’t to place any important subjects at the edge of the frame. In any case it’s much sharper than the older Petzval design in the corners 😉 (so you said wanted a sharp lens eh…) and more than enough for portrait use.
Practical aspects & DIY
These lenses are meant for use in projectors so using them on a camera requires some creativity from the user. A lot of these lenses have smooth tube barrels so you’ll have to do a bit of DIY to mount them. I think this is not something everyone might be prepared do. It only took an hour of two but I have a (bare bones) woodworking workshop. See the pictures below for inspiration on how I did it. The black rubber you see is an old bicycle (inner) tire. It serves as protection for the barrel, anti slip on the L-brackets and makes the small gap between the lens board and barrel light tight.
I have hole saws for a lot of diameters but not for the ~13cm needed for this beasty. So I used a special curve blade on my jigsaw, a steady jigsaw hand and some sanding to get it to the desired radius. It got extra tricky as my (home built) camera used 15 x 15 lens boards so not a lot of room for error with the saw. I would recommend cutting the hole first then bring it down to lens board size. But I had a bunch of “blank” lens boards around which I decided to use.
You will also need to come up with a lens cap shutter. This link gives a good intro on making a lens cap. I use a similar approach but use bookbinding canvas to cover the cap.
Finally, you will probably need some form of aperture control as f/3.6 is really wide for practical use. I haven’t done extensive testing with this but placing the aperture immediately at the front or at the back of the lens seems to work fine and doesn’t seem to cause significant vignette or loss of coverage (some optical engineer with kindly point out the aperture goes between the middle and rear element in a Cooke design but that’s a whole different DIY project). I will probably stick with putting them at the back so the aperture is inside the camera. It’s easy enough to change the aperture by taping a new piece of cardboard in place when the back is open, it doesn’t interfere with the lens cap “shutter” and is more “cosmetic” from the outside.
One thing to note if you stop down a lens in this way is it reduces the coverage area. Stopping it down to ~ f/16 focusing at infinity reduced coverage to about 23 x 17 cm in my case so just too low for 8″ x 10″. Again focusing at portrait distance greatly improves coverage but there may still be vignetting on the larger formats.
Conclusion
If you want an fast entry level wet plate portrait lens which supports large formats this lens can do that. Step it down a bit and you’ll get ok dof and quality with shortish exposure times.
On the other hand, if you want to do landscapes or dead tree trunks it’s probably not a good idea as you can get much better micro contrast (but with a higher maximum aperture) glass for the same money (search term “process lens”).
I’m quite happy with it considering what I paid although the upper range of the eBay prices seem excessive. I can’t stop my feeling that this is like the nifty fifty of wet plate lenses. It’s cheap, fast, a bokeh fest, and in the end still gives ok-pictures. Just as the fifty It’s certainly not the sharpest or most contrasty lens and it hasn’t got the nicest bokeh (no Petzval swirlies mainly). Funnily enough, it even costs about the same as an used 50mm (if you find a good deal). So again I guess you get value for money there. Downsides are the DIY required and the lack of built-in aperture control and it will probably never be sharp enough to do this with it (so any forensics people using wet plate take note!):